


How to Delete Data from an iPhone: A Practical Guide

15/01/2026

16 Mins

Feeling the squeeze of a full iPhone? This guide offers a calm, practical walkthrough to help you understand and manage your mobile's storage. We'll show you exactly how to delete data from an iPhone, clearing out what you don't need while protecting what's important. Whether you're trying to speed up a sluggish device or preparing it for a new owner, we’ve got you covered.
Why Managing Your iPhone Storage Matters
It’s a scenario we see all the time. A customer—let's call him David from Bristol—buys a lovely refurbished iPhone 12. It feels like plenty of space at first, but after a few months of taking photos, downloading apps, and saving files in WhatsApp, he gets that dreaded “iPhone Storage Full” notification. His mobile starts to slow down, and he can’t even take a new photo.
This is more than just an annoyance; a full iPhone can lead to real performance problems. When the storage is nearly full, your device has less space for the temporary files it needs to run smoothly. This can cause apps to crash, the operating system to lag, and even prevent important software updates from installing.
Learning how to delete data from an iPhone isn't just about making room for more pictures. It’s about maintaining your mobile's health and ensuring it works as intended. In this guide, we'll walk you through the process step-by-step, using clear instructions and exact menu paths so you can follow along easily.
What This Guide Will Help You Do
Our goal is to give you the confidence to take control of your device's storage. We’ll cover several key areas to help you reclaim that valuable space and get your iPhone running smoothly again.
- Identify what’s using your space: We'll start by showing you how to find the biggest culprits, from chunky apps to hidden system files.
- Target specific data for removal: You’ll learn the best ways to clear out photos, messages, and app data without losing anything important.
- Understand iCloud: We will clarify the difference between your mobile's storage and iCloud, and how to use them together effectively.
- Securely wipe your iPhone: If you're selling or trading in your device, we’ll provide a checklist to ensure your personal information is completely and safely erased.
For those who have recently bought a refurbished device and want to get the most out of it from day one, you may also find it helpful to explore some essential tips and tricks for your refurbished iPhone.
By the end of this guide, you’ll have a clear plan for managing your iPhone's storage for good.
Understanding What Is Using Your iPhone Storage
Before you can start deleting data and reclaiming precious space on your iPhone, you first need to figure out what’s taking it all up. Think of it like tidying a room; you wouldn’t just start chucking things out without seeing what's there first. Thankfully, your iPhone gives you a very clear, visual breakdown to help with this.
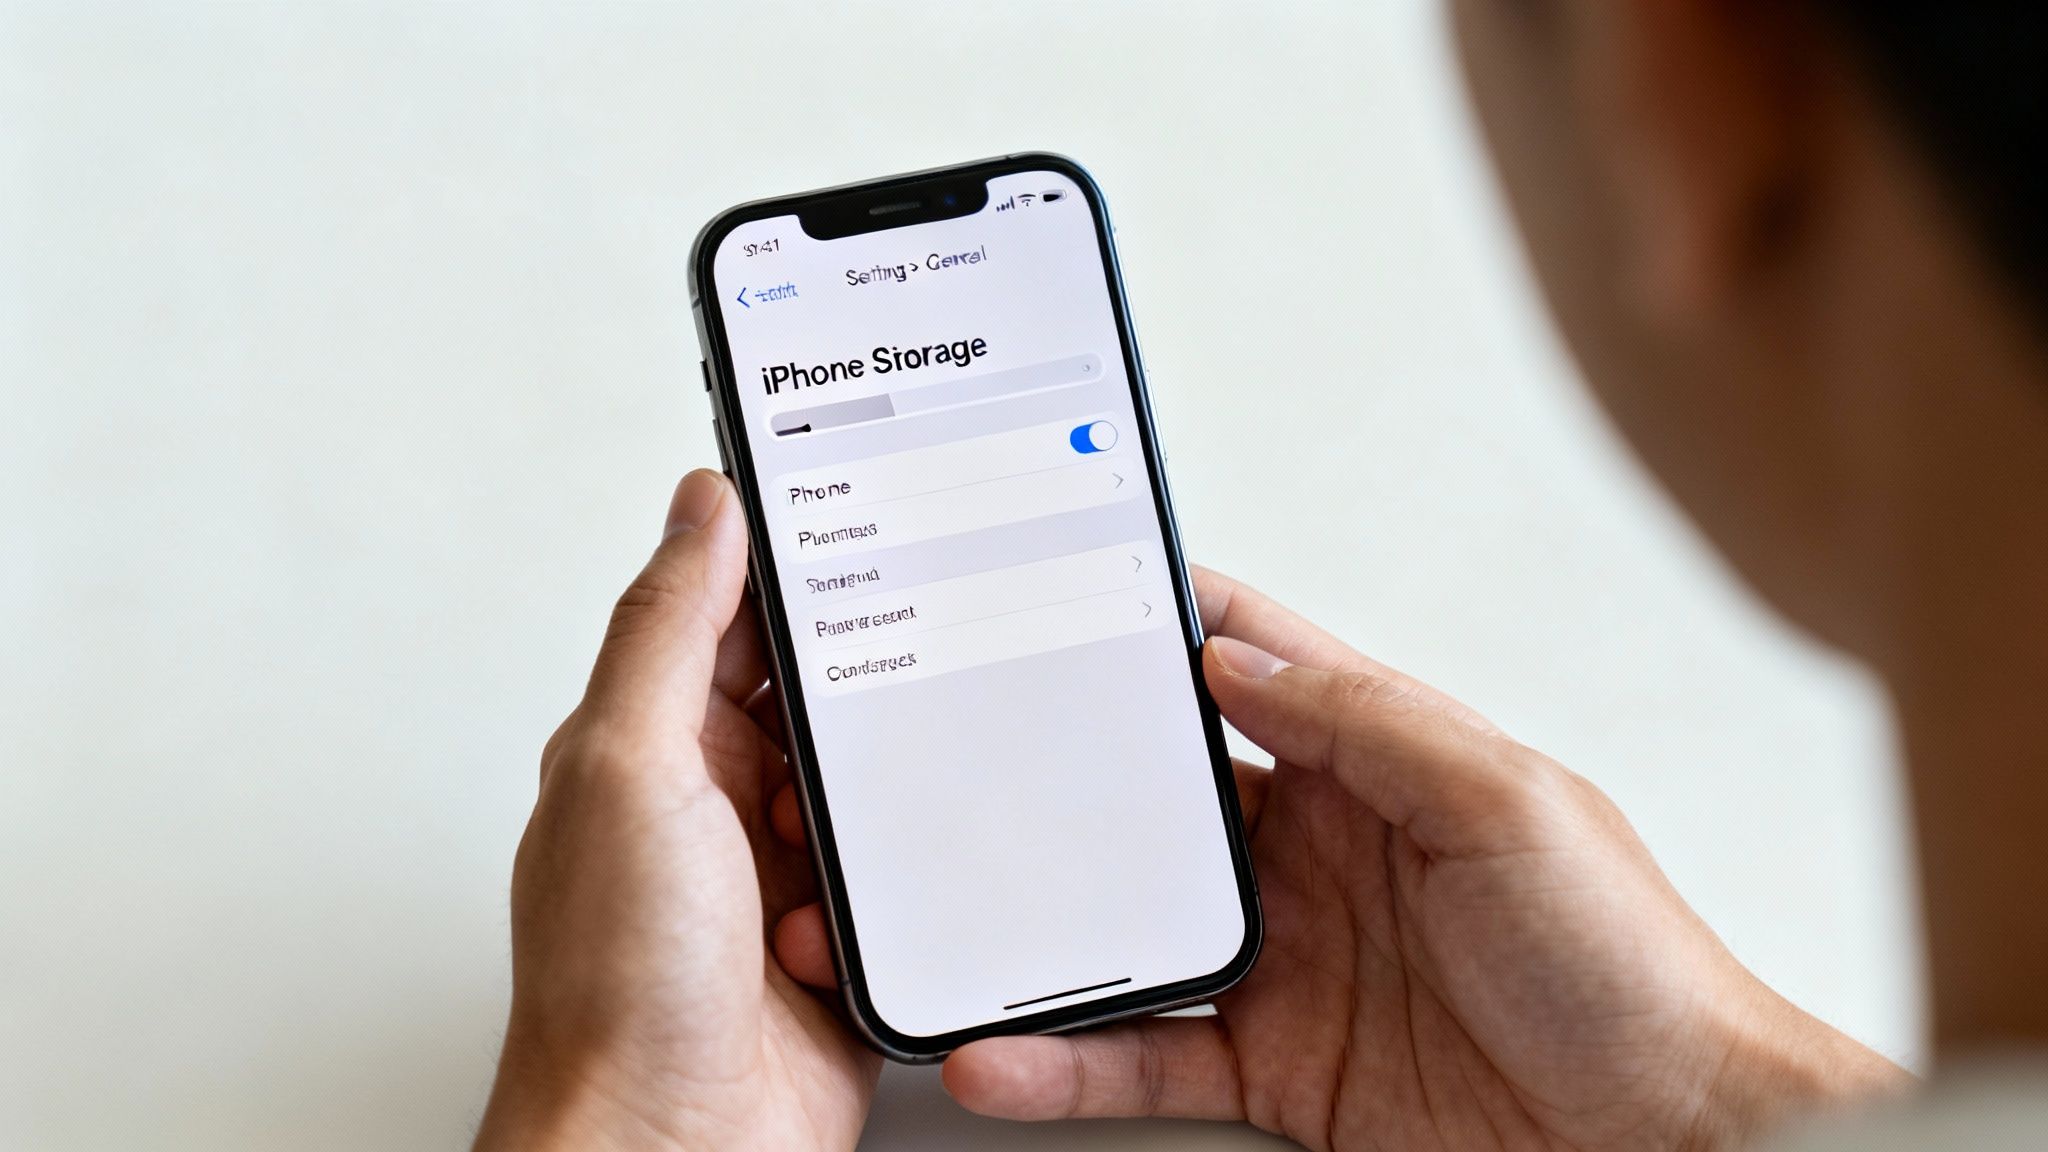
To get this overview, go to Settings > General > iPhone Storage. Give it a moment, and your mobile will show a colour-coded bar graph that lays out exactly how your storage is being used. This is your command centre for a targeted clear-out.
Decoding the Storage Bar
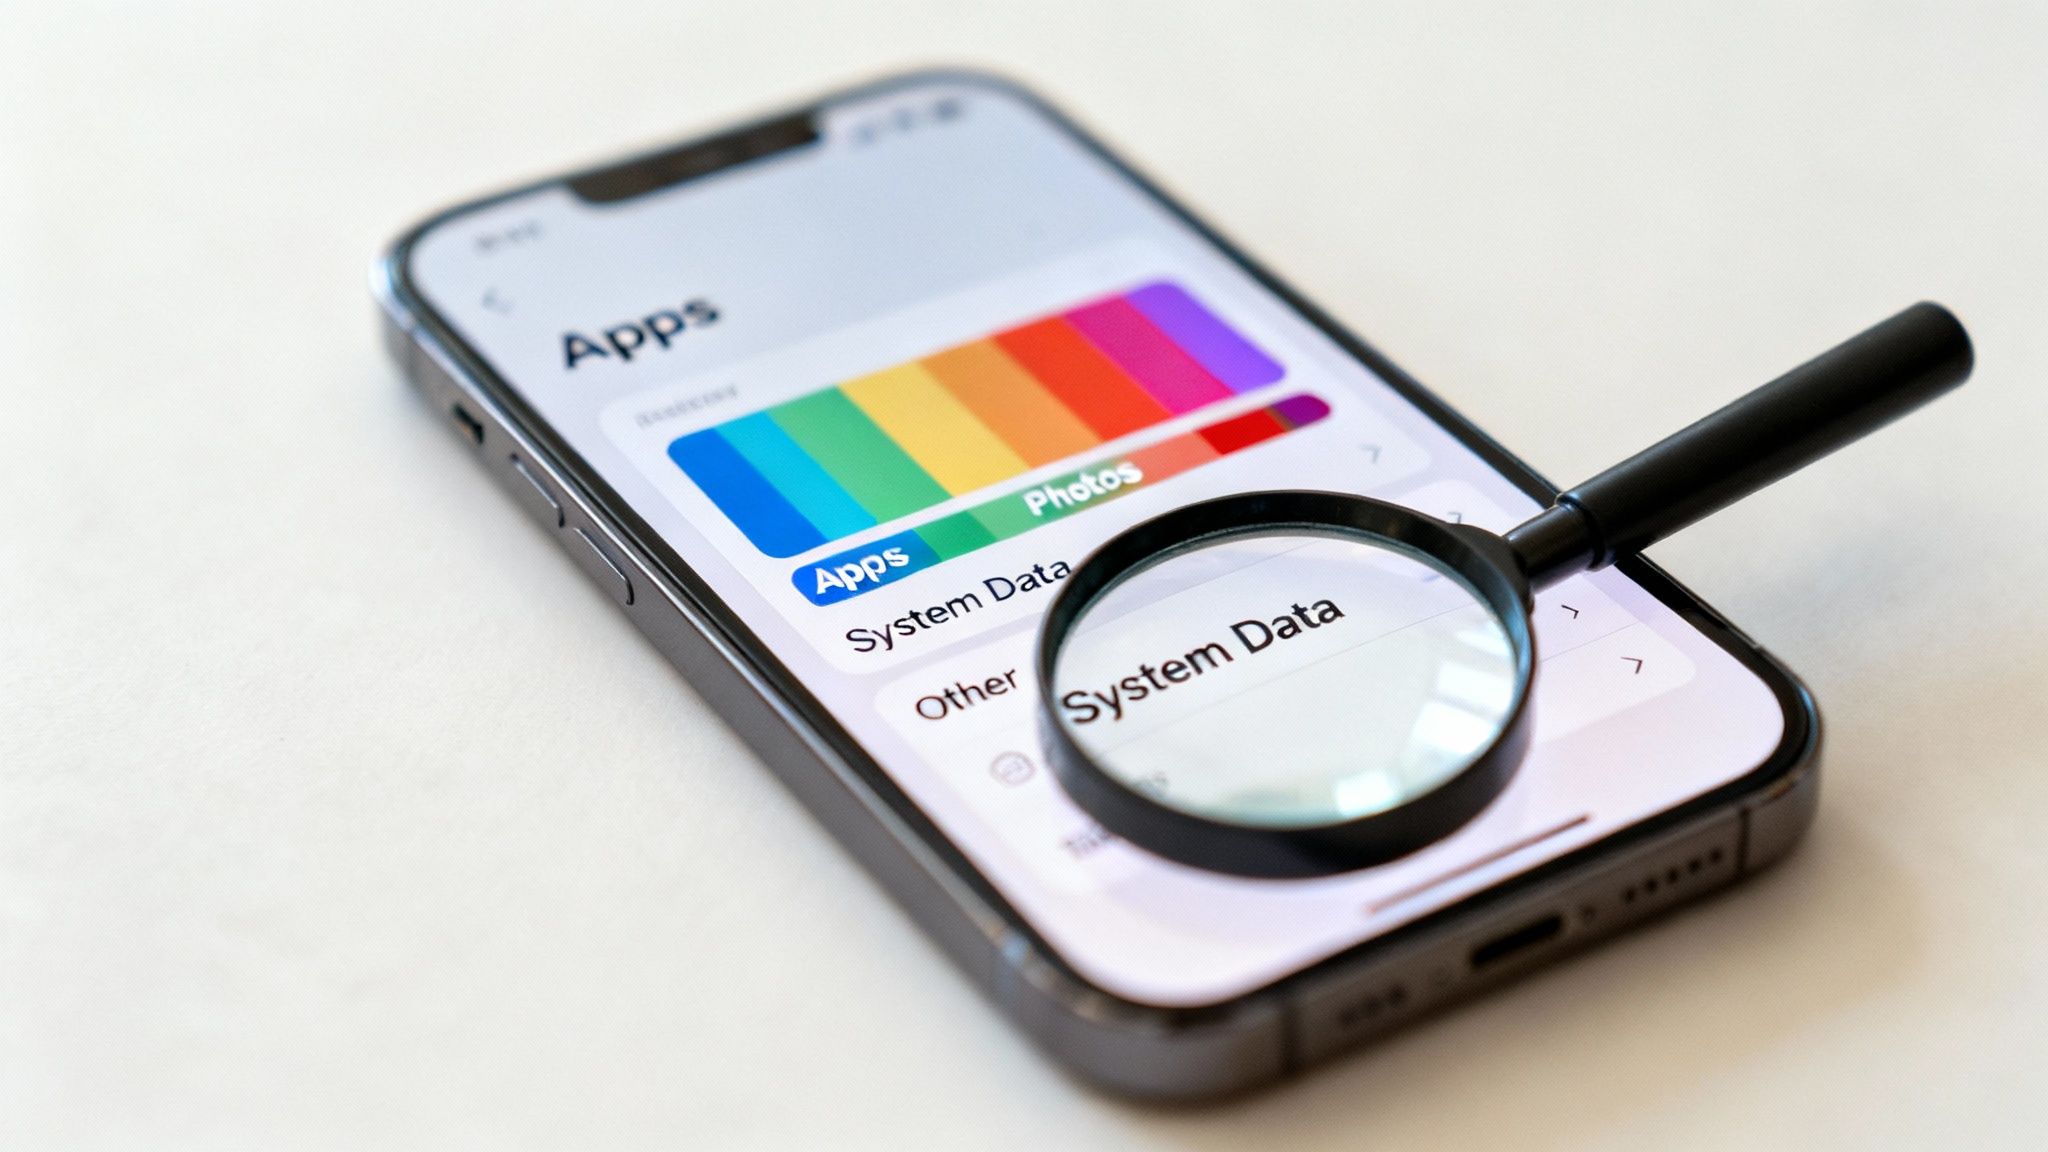
The bar graph might look simple, but it’s packed with useful information. Each coloured chunk represents a different category of data on your device.
- Apps: This is the space taken up by the applications themselves, not including their data.
- Photos: All your pictures and videos are bundled together here. For many people, this is the biggest culprit.
- Media: This holds any music, films, podcasts, and TV shows you've downloaded to watch offline.
- iOS: This is the space needed for the iPhone's operating system. You can’t do anything about this one.
- System Data: A bit of a mysterious category, this is a catch-all for things like caches, logs, and other temporary system files. It can grow in size over time.
Scroll down below the bar, and you'll see a list of every single app on your mobile, conveniently sorted from the biggest space-hogger to the smallest. This immediately points you towards your main targets.
Why Does System Data Get So Big?
'System Data' can be a really frustrating one because it’s not always obvious what it contains or why it’s so large. It's basically the mobile's digital odds-and-ends drawer, holding things like:
- Caches: Temporary files from apps and websites used to help them load faster next time.
- Software Update Files: Downloaded iOS updates that haven't been installed yet.
- Logs and Temporary Files: Data created by the system and your apps during normal use.
While you can't just tap a button to delete 'System Data' directly, things like restarting your mobile or clearing app caches (which we'll get to later) can often help shrink it back down.
Using Apple’s Recommendations
Just below the storage bar, Apple offers up a handy 'Recommendations' section. Think of it as your mobile’s own advice on how to quickly free up space. You'll often see suggestions like:
Offload Unused Apps: This removes the app itself but keeps its documents and data safe. If you reinstall it later, all your information pops right back in.
Review Large Attachments: This is a brilliant shortcut that takes you to a list of the biggest files clogging up your Messages app, letting you delete them one by one.
Enable iCloud Photos: This feature can store your full-resolution photos and videos in iCloud, leaving smaller, space-saving versions on your device instead.
These automated suggestions are an excellent first step. They make it easy to see where you can get the biggest wins when you're trying to figure out how to delete data from an iPhone. In the UK, where iPhones have a huge market share, managing this space is a common task for millions of us. For more on mobile trends, check out Uswitch's mobile statistics page.
Understanding your storage breakdown is the foundation of a successful clear-out, making sure you keep what matters and get rid of what doesn’t.
Targeting Apps, Messages, and Photos for Deletion
Right, you’ve figured out what’s eating up your iPhone’s storage. Now it’s time to take action. For most of us, the three biggest culprits are apps, messages, and photos. Clearing these out properly is the fastest way to reclaim a serious amount of space.
But before you start deleting, a quick word of warning.
Warning: Deleting apps, photos, and messages can be permanent. Always double-check that you have a recent backup of your iPhone, either on iCloud or a computer, before you begin. You don't want to accidentally erase a treasured memory or an important file.
With that crucial safety net in place, let's start with your applications.
Managing Your Apps: Offload vs Delete
When you head into Settings > General > iPhone Storage and tap on an app, you’ll see two options: 'Offload App' and 'Delete App'. It’s important to know the difference, as picking the wrong one can lead to frustration or lost data.
- Offload App: This is a clever space-saving feature from Apple. It removes the application itself but keeps all your personal data and documents safe on the device. The app icon stays on your Home Screen with a small cloud symbol next to it. Tap it, the app redownloads, and you can pick up exactly where you left off.
- Delete App: This is the more permanent option. It completely removes the app and all of its related data from your iPhone. Once it's gone, the only way to get your data back is to restore it from an old backup.
To help you decide which path to take, here’s a quick comparison.
Offload vs Delete App: What's the Difference?
This table breaks down exactly what happens when you choose to either offload or delete an app, helping you make the right choice for your needs.
| Action | What Happens to the App Icon? | What Happens to Your Data? | How Much Space is Freed? | When to Use It |
|---|---|---|---|---|
| Offload App | Stays on your Home Screen with a small cloud icon. | Your data and documents are kept safely on the device. | Frees up the space used by the app itself. | For apps you use seasonally or infrequently but want to keep your data for, like a holiday booking app or a game. |
| Delete App | The icon is removed completely from your Home Screen. | All data, documents, and settings are permanently removed. | Frees up the space used by the app AND all its data. | For apps you no longer need at all, or for apps where you don't need to keep any locally stored data. |
Ultimately, offloading is perfect for temporary space-saving, while deleting is for a permanent clear-out.
Clearing Your Photo Library
For most of us, the Photos app is the single biggest storage hog on our mobile. It’s packed with years of memories, videos, screenshots, and downloaded images. Tackling this head-on is a huge step in freeing up your iPhone.
Deleting photos is straightforward, but there’s a crucial extra step that catches many people out.
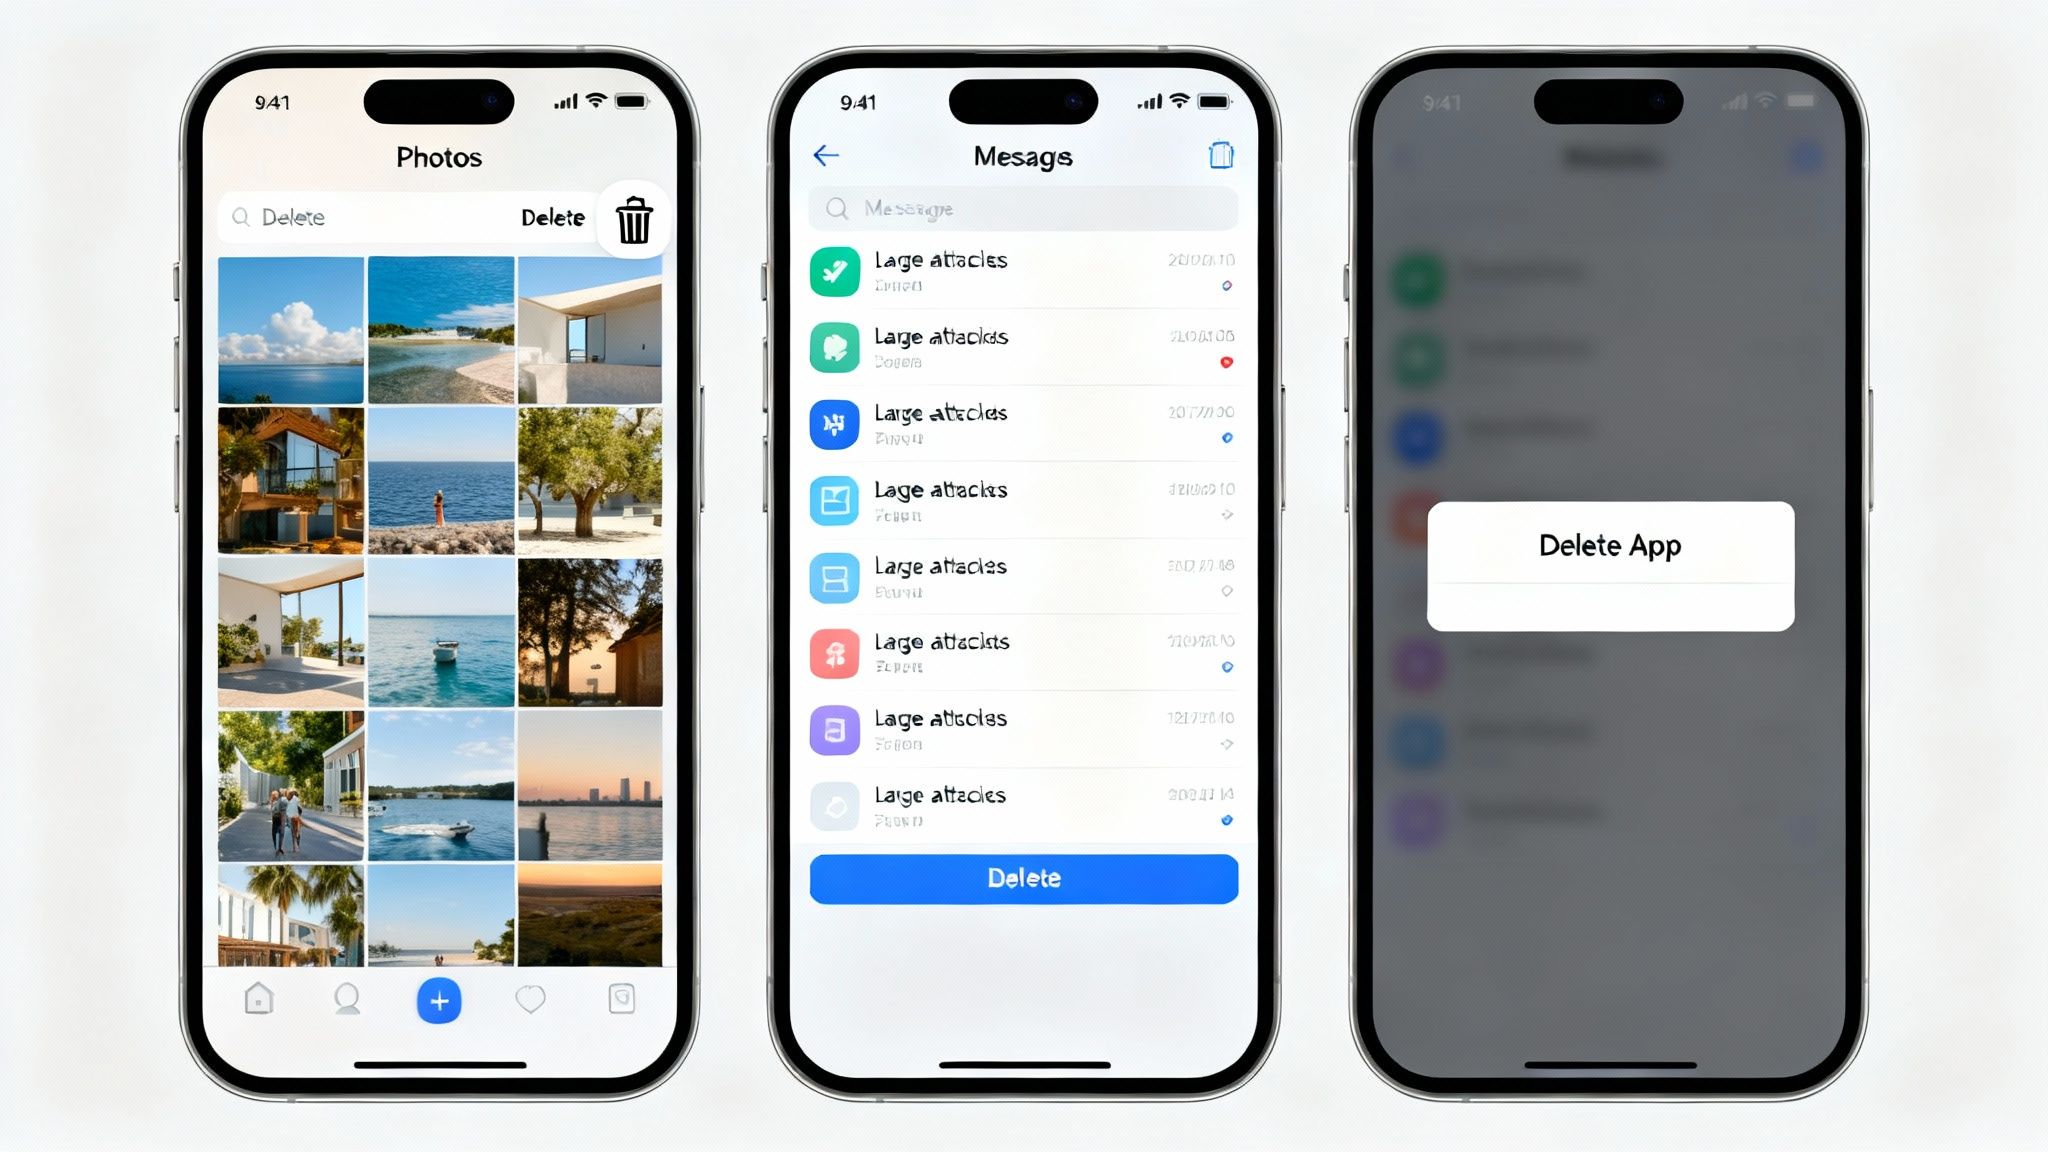
- Open the Photos app.
- Go to your Library and tap Select in the top-right corner.
- Tap the photos and videos you want to get rid of, then hit the bin icon at the bottom.
- A pop-up will ask you to confirm. Tap Delete Photos.
This doesn’t actually free up the space straight away. Apple moves the deleted items to a special album to give you a 30-day grace period in case you change your mind. To permanently remove them and get your storage back, you have to empty this album.
To finish the job, go to Photos > Albums, scroll right to the bottom, and tap on Recently Deleted. Here, you can tap Select, then Delete All to wipe them for good. Your iPhone will warn you that this action is permanent, and that’s when you’ll finally see those gigabytes returned to you.
Tackling Large Attachments in Messages
Your Messages app can be a silent storage killer. Every photo, video, and GIF you’ve ever sent or received is tucked away in your chat history, and it all adds up over time. Thankfully, iOS gives you an easy way to find and delete the biggest files.
Just go to Settings > General > iPhone Storage > Messages. You should see categories like 'Top Conversations', 'Photos', and 'Videos'. Tapping on one of these will show you a list of all the relevant files, neatly sorted by size.
From there, you can just swipe left on any massive video or photo collection to delete it, without having to scroll through years of conversation. It’s a much faster way to manage message data.
Don't Forget Your Browser Cache
Finally, another area that quietly collects data is your web browser, Safari. Over time, it saves website data, images, and files (known as a cache) to help pages load faster next time you visit. While this is helpful, the cache can build up and take up a surprising amount of space.
Clearing it out is simple:
- Navigate to Settings > Safari.
- Scroll down and tap on Clear History and Website Data.
- Confirm your choice in the pop-up window.
This removes your browsing history, cookies, and other cached data, often freeing up a decent chunk of storage. It’s a quick and easy win. If you're still facing persistent storage issues after all this, a full iPhone reset can be a final resort, but always back up your data first.
Managing iCloud to Optimise Your iPhone Storage
One of the most common points of confusion we hear is the difference between your iPhone storage and your iCloud storage. The easiest way to think about it is this: your iPhone storage is the physical space inside your mobile, like a computer's hard drive. iCloud is a separate, online space—like a secure digital locker for your files.
Getting to grips with iCloud is a brilliant strategy for freeing up gigabytes on your device without actually losing your precious files. By moving things to the cloud, you can keep your iPhone feeling quick and responsive.
Checking Your iCloud Storage
First things first, let's see what your iCloud situation looks like. You can get a clear overview with just a few taps:
- Go to Settings > [your name] > iCloud.
Here, you'll see a familiar-looking coloured bar, similar to the one for your iPhone's local storage. This breakdown shows you exactly what's taking up your cloud space, which is often dominated by Photos, Backups, and iCloud Drive files. Every Apple ID comes with a free 5GB of iCloud storage, but as you've probably discovered, that fills up surprisingly fast.
Using Optimise iPhone Storage for Photos
For most people, photos and videos are the biggest space-hoggers by far. This is where one of iCloud's best features comes into play: Optimise iPhone Storage. When you turn this on, your mobile keeps the full-resolution original of every photo and video safely stored in iCloud.
A much smaller, compressed version stays on your device, which still looks fantastic on the screen but uses a tiny fraction of the space. The moment you want to view, edit, or share an image, your iPhone pulls down the full-quality version from iCloud.
To switch this on:
- Navigate to Settings > [your name] > iCloud > Photos.
- Make sure that Sync this iPhone is toggled on.
- Then, just select Optimise iPhone Storage.
This single change can free up a massive amount of local storage, especially if you have a huge photo library. It's a key part of any plan for clearing space on your iPhone.
Deleting Old iCloud Backups
Another great way to claw back iCloud space is by getting rid of old, unneeded backups. Every time you upgrade your iPhone, you might create a new backup, leaving the old one just sitting there in your iCloud account, taking up valuable gigabytes.
Let’s say you just bought a refurbished iPhone 14 to replace your old iPhone 11. After you've moved everything across, the backup from your old iPhone 11 is probably no longer needed. Deleting it can clear a good chunk from your iCloud account.
Warning: Before you delete any backup, be absolutely certain you don't need it anymore. This is permanent and cannot be undone. Always check that your current device is backing up correctly before you remove old ones.
To manage your backups:
- Go to Settings > [your name] > iCloud > Manage Account Storage > Backups.
You’ll see a list of device backups stored in your account. Just tap on an old or redundant one and then select Delete & Turn Off Backup. This removes the data and stops that device from backing up again, clearing space for your current mobile.
While this doesn't directly free up your device storage, it makes sure you have enough iCloud space for features like Optimise Photos to work properly. When you're relying on the cloud, it's also wise to understand the ins and outs of cloud backup security to keep your data protected.
How to Securely Wipe Your iPhone for Sale or Trade-In
If you're selling your mobile, giving it away, or trading it in, a quick clean-up just won’t cut it. Simply deleting a few files might feel like you’re protecting your privacy, but it often leaves personal data recoverable. To truly safeguard your information, you need to perform a full, secure wipe that returns the device to its original factory state.
The process boils down to three critical stages: back up your data, sign out of your Apple account, and finally, erase everything. Following these steps in order ensures the new owner can set up the mobile as their own, with absolutely no trace of your personal life left behind.
The Pre-Wipe Checklist
Before you hit that final erase button, it’s vital to prep your iPhone properly. Skipping a step—especially signing out of your Apple ID—can cause massive headaches for the next owner. This is what’s known as Activation Lock, and it effectively turns the mobile into a useless brick for anyone else.
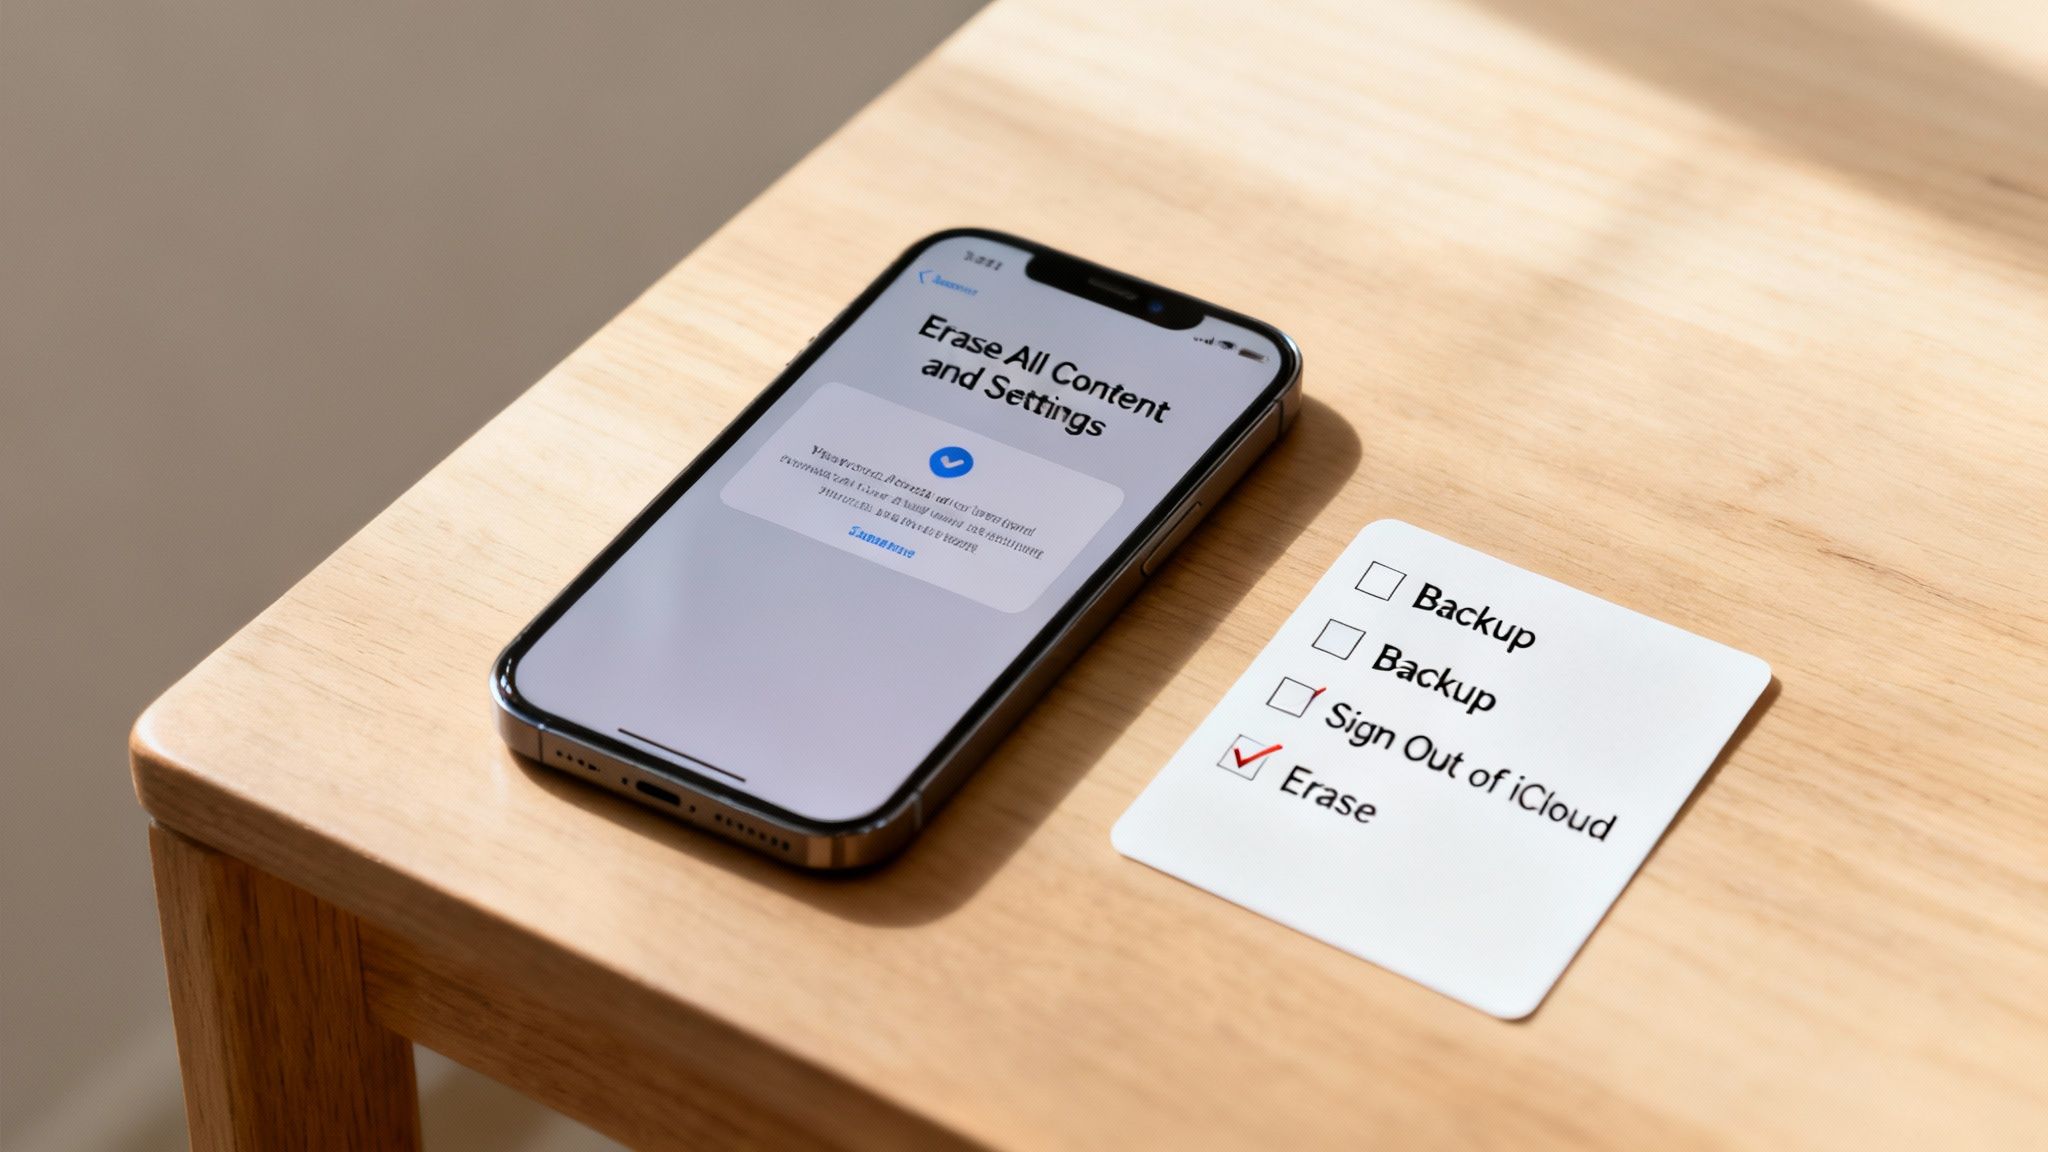
Here’s a simple checklist to follow in the correct order:
- Create a final backup: Make sure you have an up-to-date copy of all your data. You can back up to iCloud by going to Settings > [your name] > iCloud > iCloud Backup and tapping Back Up Now. Alternatively, connect your mobile to a computer and use Finder or iTunes.
- Sign out of your Apple ID: This is the most important step. It disconnects all your Apple services and, crucially, deactivates 'Find My', which removes the Activation Lock.
- Erase the device: This is the final move that securely wipes all your content and settings from the iPhone itself.
Getting these steps right, in this sequence, guarantees a smooth and secure handover.
A Step-by-Step Guide to Wiping Your iPhone
Once you’re confident you have a secure backup, you can move on to wiping the device. The most crucial part of this is signing out of your account to ensure the mobile is no longer linked to you in any way.
Signing Out of iCloud and App Store
First things first, you need to remove your digital identity from the iPhone. This uncouples your photos, messages, contacts, and purchase history from the physical device.
- Open the Settings app on your iPhone.
- Tap on your name right at the top of the screen.
- Scroll all the way down to the bottom and tap Sign Out.
- You'll be asked for your Apple ID password to turn off 'Find My'. This is a vital security step.
- You might be asked if you want to keep a copy of certain data (like calendars or contacts) on the mobile. Since you’re about to erase everything anyway, it doesn't matter what you choose here.
- Tap Sign Out again to confirm.
Once you’ve successfully signed out, your name will disappear from the top of the Settings menu. The iPhone is now disconnected from your account and ready for the final wipe.
Erasing All Content and Settings
Now for the grand finale: the factory reset. This action securely deletes every bit of data on the iPhone's internal storage, returning it to the pristine state it was in when it first came out of the box.
Final Warning: This action is irreversible. Once you proceed, all data on the device will be gone for good. Double-check that your backup is complete and successful before you continue.
To perform the factory reset:
- Navigate to Settings > General > Transfer or Reset iPhone.
- Tap on Erase All Content and Settings.
- You will see a summary screen explaining exactly what will be removed. Tap Continue.
- Enter your device passcode to confirm it’s really you.
The iPhone will then kick off the erasure process, which usually takes a few minutes. When it’s done, the device will restart and display the "Hello" screen, ready for a new owner to set it up. For a more detailed walkthrough of this final stage, our guide on how to reset an iPhone to factory settings provides additional information. Properly completing this process is the best way to securely delete data from your iPhone before it changes hands.
Common Questions About Deleting iPhone Data
When it comes to managing your mobile, certain questions pop up time and time again. This section gives you quick, clear answers to the most common queries we hear from customers, helping you solve frequent problems without the fuss.
Why Is My iPhone Storage Full with Few Photos or Apps?
This is a really common issue, and the culprit is often the mysterious 'System Data' or large app caches. System Data includes temporary files, logs, and other bits your iPhone needs for its day-to-day running. A simple restart or syncing your mobile with a computer can sometimes shrink this category.
Also, have a look at apps like WhatsApp, Safari, or social media platforms. They can store enormous amounts of 'Documents & Data' over time. You can see this by going to Settings > General > iPhone Storage and tapping on an individual app. If the app has its own option to clear its cache, doing so can free up a surprising amount of space.
If I Delete Photos from My iPhone Are They Also Deleted from iCloud?
This depends entirely on your settings. If you have 'iCloud Photos' turned on (check this in Settings > [your name] > iCloud > Photos), then yes. Deleting a photo from your iPhone will also remove it from iCloud and any other device logged into that same Apple ID.
If your goal is to keep the photo safely in iCloud but get the large file off your mobile, you should use the Optimise iPhone Storage setting instead. This swaps the full-resolution image on your mobile for a much smaller version, saving local space. It’s always worth double-checking your settings before you start deleting precious memories.
Does Erase All Content and Settings Truly Delete My Data Permanently?
Yes, for all practical purposes, this action performs a secure and permanent wipe of your iPhone's data. Modern iPhones use file-based encryption. When you choose 'Erase All Content and Settings', the unique encryption key that locks all your data is destroyed. Without that key, the underlying information becomes a jumble of inaccessible code, unrecoverable by any standard method.
This is the official, secure method recommended by Apple before selling or giving away your device. Just remember to sign out of your Apple ID first to remove the Activation Lock. This is a crucial step in our guide on how to prepare your iPhone for sale.
For those curious about data retrieval after deletion, you can learn more about general methods on how to recover deleted files. However, Apple's encryption makes this extremely difficult on a properly wiped iPhone.
What Is the Safest Way to Back Up My iPhone Before Wiping It?
You have two excellent and reliable options for backing up your device before you delete data from an iPhone.
- iCloud Backup: This is easily the most convenient method. Go to Settings > [your name] > iCloud > iCloud Backup and tap 'Back Up Now'. You'll need to be on a stable Wi-Fi network and have enough free iCloud storage for it to complete.
- Computer Backup: This involves connecting your iPhone to a Mac (using Finder) or a Windows PC (using iTunes). Once it’s connected, select your device and click 'Back Up Now'. This way is often faster and has the added benefit of not using up your iCloud storage allowance.
For absolute peace of mind, especially if you have irreplaceable data, doing both is the safest bet. A local backup on your computer and a cloud backup with iCloud gives you two separate copies of all your important information.
Written by James Waterston — 24 years in the mobile phone industry from customer service to Sales Director of a global repair & recycling company; now running Used Mobiles 4 U for 8+ years. LinkedIn
")


