


Black Screen on iPad: Practical Fixes That Actually Work

03/08/2026

8 Mins

A black screen on an iPad usually isn't a dead iPad. More often, it's a frozen system, a depleted battery, or a display issue that can be separated with a few simple checks before you risk a reset.
Quick Answer
- Check for sleep, dimming, or a smart cover first, because the iPad may still be on.
- Charge it from a known-good Apple adapter, not a weak laptop port or random cable.
- Force restart next, using the correct button sequence for your model.
- Use the torch test if the screen stays black after a restart.
- Only move to Recovery Mode if the software steps fail, because data loss becomes a real risk.
If you want a starting point for the common power checks, this guide to simple iPad power-on solutions is the right place to begin.
What to Check Before You Press Any Buttons
The most annoying version of a black screen on iPad is the one that only looks dead. The device can be awake, dimmed, or sitting under an auto-lock or smart cover trigger, and that means you can waste time on resets that never needed to happen.
Check whether it's actually on
Start with ambient light and brightness. iFixit's troubleshooting advice specifically calls out checking whether the screen is too dim to see, and that's a sensible first move because a functioning panel can look blank in a dark room or at an awkward angle. A misaligned cover can also wake the sleep magnet and make the iPad appear off even when it isn't.
Practical rule: if you can hear alerts, feel vibrations, or notice the device warming slightly on charge, treat it as powered on until proven otherwise.
Clear the obvious charging issues
Look at the Lightning or USB-C port before you do anything else. Lint packed into the port can stop current flow, and a charging fault often gets mistaken for a system crash when the battery has gone flat. Apple also recommends charging with a known-good 10W or 12W Apple power adapter connected to AC power with a compatible cable, because weak charging setups can leave you chasing the wrong fault.
If the port looks dirty, don't dig in with a metal pin. A soft, careful clean is better than turning a charging issue into a damaged port.
Avoid a reset too early
A quick visual check saves data and saves time. If the iPad is sleeping, dimmed, or held under a cover trigger, a force restart won't fix the problem, it just adds unnecessary wear to your troubleshooting path. That's why bench work always starts with power, light, and cover position before buttons.
How to Force Restart Your iPad
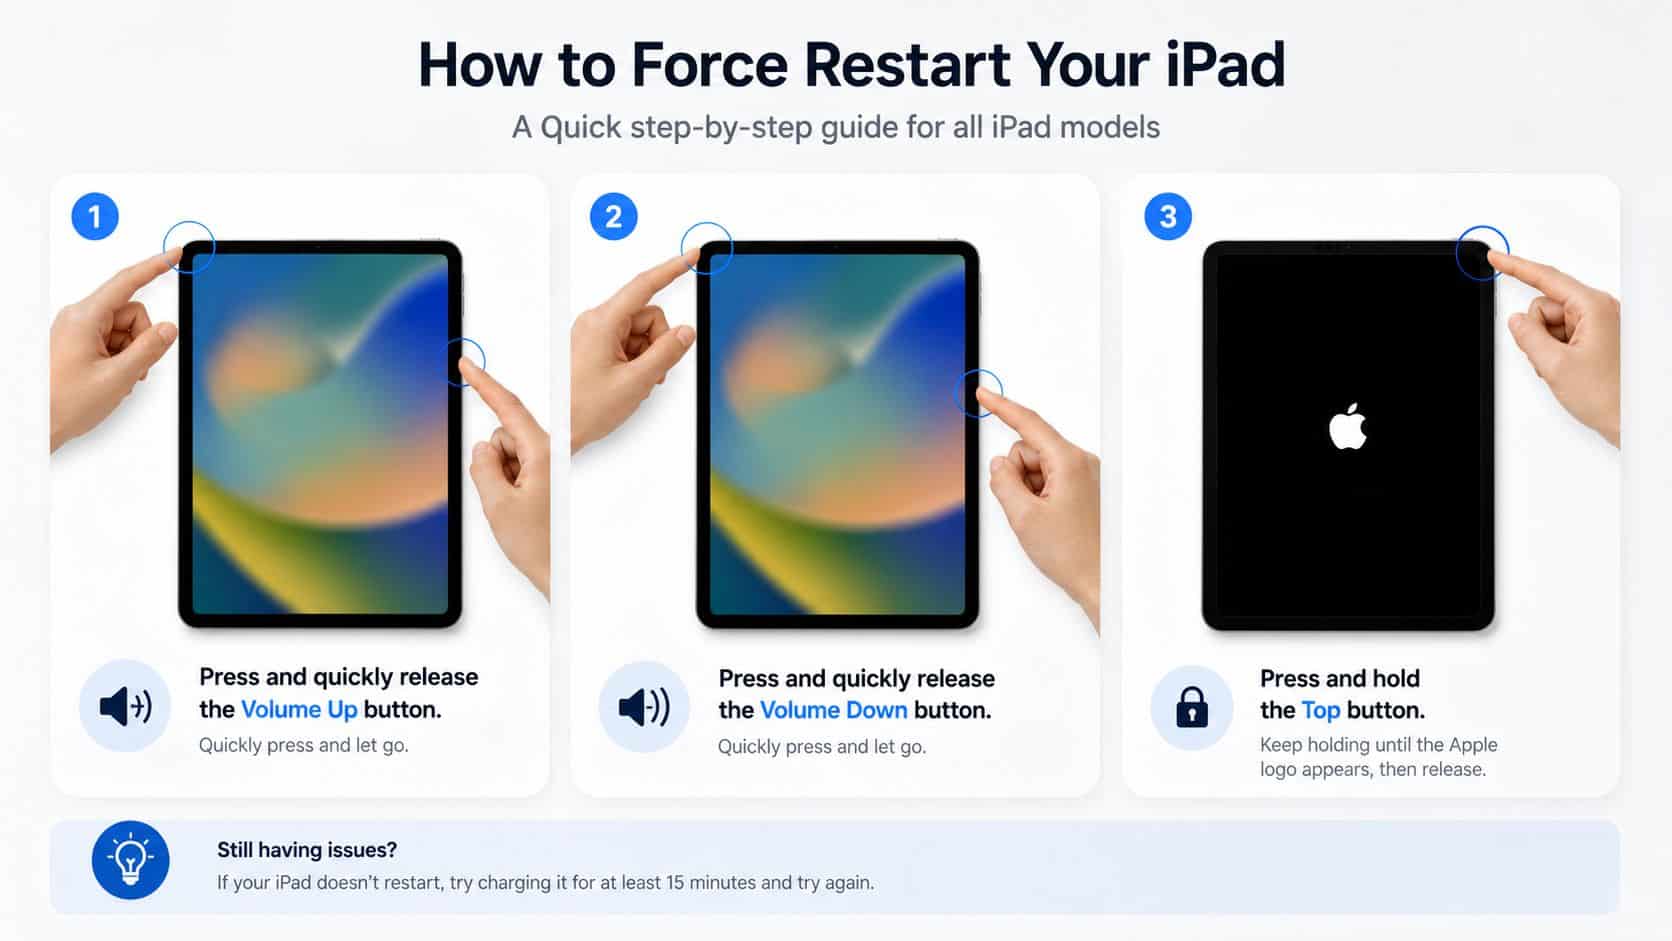
If the quick checks don't bring it back, a force restart is the next sensible move. Apple's support guidance centres on this step for a black screen, and it's the least disruptive fix when the software has frozen rather than failed completely. Apple also advises charging for at least 1 hour if the iPad won't turn on, because a flat battery can present as a black display. Apple's black-screen guidance lays out the model-specific button paths.
Use the right button sequence
For iPads with Face ID or power-button Touch ID, press and release Volume Up, press and release Volume Down, then hold the Top button until the Apple logo appears. For iPads with a Home button, hold Home + Top/Sleep-Wake together until the logo shows. Timing matters here, because releasing too early often does nothing and holding the wrong way can shut the device down instead of restarting it.
Hold the last button until you see the logo, not until you think it should have worked.
Give the battery a fair chance
If the battery is depleted, the restart may fail even though the iPad is fine. In practice, plugging it into a proper wall charger first is often what makes the restart sequence succeed the second time rather than the first. Independent repair guidance also recommends leaving it on charge for 10 to 20 minutes before attempting the force restart, which fits the way flat batteries behave on the bench. Vivid Repairs' black screen guide reflects that approach.
What success looks like
If the Apple logo appears, you're probably dealing with a software freeze or a battery-related shutdown rather than a dead mainboard. If nothing happens at all, move on to fault separation rather than repeating the same restart endlessly. That's where the torch test becomes useful.
Diagnosing Hardware vs Software Failures
A force restart that doesn't even produce an Apple logo changes the odds. At that point, the job is to separate a software problem from a display or charging fault, because the fix depends on which layer has failed.
Use the torch test before assuming the screen is dead
Shine a flashlight across the panel at an angle in a darkened room. If you can see a faint image, the LCD is still drawing an image but the backlight has failed, which means the iPad is likely powering on even though the display looks black. That's a very different fault from a dead logic board, and it changes the repair path completely. iMobie's black screen diagnostics covers that practical distinction.
A common example we see is an iPad that seems unresponsive on a counter, yet the torch test reveals the lock screen ghosted faintly underneath. That's not a “won't turn on” problem, it's a display chain problem.
Inspect the port and charging path
If the torch test shows nothing, check the charging side again. Lint in the port can block current, and a bad cable or weak charger can imitate a major failure. Apple's advice to test with a known-good charger is there for a reason, because accessories fail more often than people think.
Know when repair stops being practical
Repairability matters here. Apple's UK iPad repair score is only 3.5 out of 10 on the iFixit repairability index, which helps explain why component-level DIY work is rarely the sensible route for most owners. Used Mobiles 4 U troubleshooting is useful if you're deciding whether the problem is worth pushing further or handing over to a technician.
Using Recovery Mode as a Last Resort
When the iPad powers up but the screen stays black or the system won't boot properly, Recovery Mode is the last software step before you start thinking about hardware. It's more invasive than a restart, so you only use it when the simpler fixes have failed.
Choose Update before Restore
Connect the iPad to a Mac or PC, then enter Recovery Mode using the same button logic you'd use for a force restart. Once the computer detects the device, choose Update rather than Restore if that option appears. Update tries to reinstall iPadOS without immediately wiping data, while Restore clears everything, so the safer order is always repair first, erase second.
If you've ever tried to recover data from a damaged storage device, the same principle applies. A useful general reference on data recovery trade-offs is recover data from formatted SD card, because the key lesson is the same, act before you overwrite anything important.
What to expect at the bench
The computer may take a while to detect the iPad, and the screen may stay black during that process. If Finder or iTunes doesn't recognise it, the cable, port, or battery state may be the issue rather than iPadOS itself. That's the point where a repairer stops treating it as a software fault and starts checking for deeper board, screen, or power problems.
Use the right reference steps
If you want the exact Apple-style sequence for entering this mode and working through the prompts, follow restore your iPad with these steps. Keep in mind that a restore can cost you data if the update path fails, so it should never be your first reflex.
Our Experience Refurbishing This Model at Used Mobiles 4U
On the refurbishment bench, a black screen on iPad usually falls into one of three camps, battery trouble, display trouble, or software that's wedged itself hard enough to mimic a fault. Our technicians often see older units with tired batteries that struggle to wake properly, plus devices with display issues that only show up under closer testing.
One thing we regularly notice is that a screen fault doesn't always mean a full panel replacement. A device can still pass touch tests, show a faint image, or charge normally while the backlight path has failed, and that changes the repair decision. Our team also checks charging port condition, because a port full of compacted debris can make a healthy iPad look far worse than it is.
What we check before resale
- Backlight uniformity, because uneven lighting often points to display wear that needs attention.
- Digitiser response, because a screen can look fine while touch behaves badly.
- Charging port condition, because a bad port can create false no-power reports.
- Battery behaviour, because weak cells can cause black-screen complaints on older devices.
A cosmetic mark is one thing, a functional display fault is another. That's why grading has to reflect what the device does under test, not just how clean the glass looks from a distance.
A black screen complaint on an older iPad is often a repair-or-replace decision, not just a “fix the screen” decision.
Used Mobiles 4 U Refurbishment Process shows how that sort of testing fits into proper resale prep, from diagnosis through to final checks. For customers, the question is whether a screen repair brings the device back to sensible daily use, or whether the money is better put towards a refurbished replacement with warranty.
When to Repair and When to Replace
Repair makes sense when the iPad is still a good fit for your day-to-day use, the battery is decent, and the model still has enough life left in software support. It also makes more sense on newer iPad Air or iPad Pro devices, where the overall value of the machine justifies professional repair.
Choose repair if
- The model is newer, and the rest of the device is in good shape.
- Battery health is still acceptable, so you're not fixing one fault only to expose another.
- You need to keep your data and setup, and a restore would be painful.
- The display fault looks isolated, not part of wider board damage.
Choose replacement if
- The iPad is older, and software support is becoming a concern.
- The battery is weak, the casing is tired, and the screen fault is only one of several issues.
- You want a cleaner long-term fix, with warranty and less bench risk.
For a lot of customers, replacement is the calmer option. A refurbished iPad gives you a tested battery, a clear grade, and far less uncertainty than chasing an ageing device through repeat repairs. If the black screen is part of a wider decline, I'd rather see you move to a better unit than pour effort into one that's already asking for a second repair.
Written by James Waterston, 24 years in the mobile phone industry from customer service through to Sales Director of a global repair and recycling company. Now running Used Mobiles 4U for over 8 years.
LinkedIn: https://uk.linkedin.com/in/james-waterston-9039a21a
A black screen on iPad is worth repairing when the device is otherwise solid and the fault is clearly software or display-related. If it's older, unreliable, or edging towards support limits, replacement is usually the better call. Explore the refurbished options and trade-in path at Used Mobiles 4 U, and choose the route that gets you back to a working iPad without wasting money on the wrong fix.
Looking for a refurbished phone?
Shop professionally tested refurbished iPhones and Samsung phones with 18 month warranty, 30 day returns and free UK delivery.
Browse Refurbished Phones